Creating a VS Code editor extension
| CommentsAs I’ve been working more with Visual Studio Code lately, I wanted to explore more about the developer experience and some of the more challenging areas around customization. VS Code has a great extensibility model and a TON of UI points for you to integrate. In the C# Dev Kit we’ve not yet had the need to introduce any custom UI in any views or other experiences that are ‘pixels’ on the screen for the user…pretty awesome extensibility. One area that doesn’t have default UI is the non-text editors. Something that you want to do fully custom in the editor space. For me, I wanted to see what this experience was so I went out to create a small custom editor. I chose to create a ResX editor for the simplest case as ResX is a known-schema based structure that could easily be serialized/de-serialized as needed.
NOTE: This is not an original idea. There are existing extensions that do ResX editing in different ways. With nearly every project that I set out with, it starts as a learning/selfish reasons…and also selfish scope. Some of the existing ones had expanded features I felt unnecessary and I wanted a simple structure. They are all interesting and you should check them out. I’m no way claiming to be ‘best’ or first-mover here, just sharing my learning path.
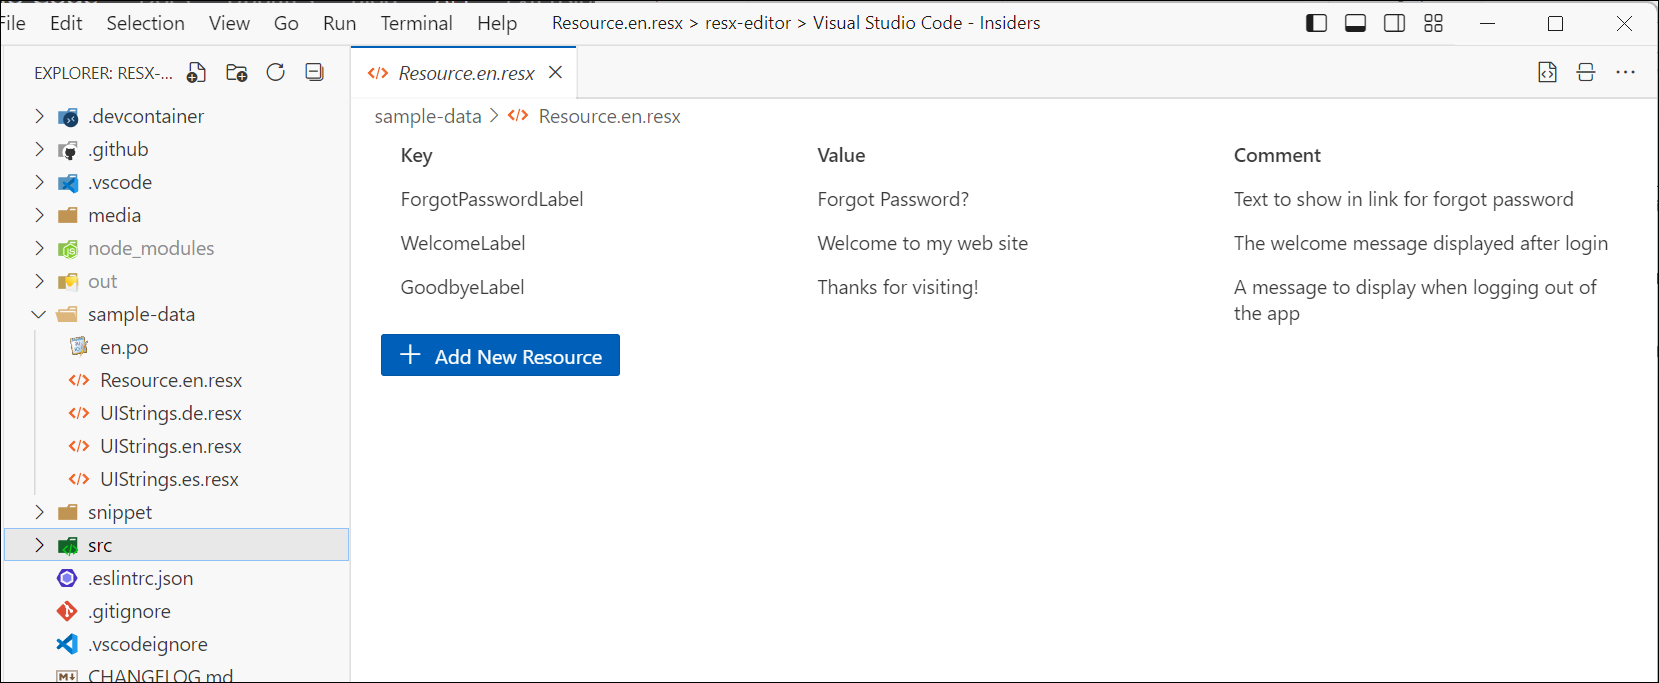
With that said, I’m pleased with what I learned and the result, which is an editor that ‘fits in’ with the VS Code UX and achieves my CRUD goal of editing a ResX file:

With that, here’s what I’ve learned a bit…
Custom Editors and UI
There are a lot of warnings in the Custom Editor API docs of making sure you really need a custom editor, but point to the value of what they can provide for previewing/WYSIWYG renderings of documents. But they point to the fact that you will likely be using a webview and thus be fully responsible for your UI. In the end you are owning the UI that you are drawing. For me, I’m not a UI designer, so I rely on others/toolkits to do a lot of heavy lifting. The examples I saw out there (and oddly enough the custom editor sample) don’t match the VS Code UX at all and I didn’t like that. I actually found it odd that the sample took such an extreme approach to the editor (cat paw drawings) rather than show a more realistic data-focused scenario on a known file format.
Luckily the team provides the Webview UI Toolkit for Visual Studio, a set of components that match the UX of VS Code and adhere to the theming and interaction models. It’s excellent and anyone doing custom UI in VS Code extensions should start using this immediately. Your extension will feel way more professional and at home in the standard VS Code UX. My needs were fairly simple and I wanted to show the ResX (which is XML format) in a tabular format. The toolkit has a data-grid that was perfect for the job…mostly. But let’s start with the structure.
Most of the editor is in a provider (per the docs) and that’s where you implement a CustomTextEditorProvider which provides a register and resolveCustomTextEditor commands. Register does what you think, register’s your editor into the ecosystem, using the metadata from package.json about what file types/languages will trigger your editor. Resolve is where you start providing your content. It provides you with a Webview panel where you put your initial content. Mine was a simple grid:
private _getWebviewContent(webview: vscode.Webview) {
  const webviewUri = webview.asWebviewUri(vscode.Uri.joinPath(this.context.extensionUri, 'out', 'webview.js'));
  const nonce = getNonce();
  const codiconsUri = webview.asWebviewUri(vscode.Uri.joinPath(this.context.extensionUri, 'media', 'codicon.css'));
  const codiconsFont = webview.asWebviewUri(vscode.Uri.joinPath(this.context.extensionUri, 'media', 'codicon.ttf'));

  return /*html*/ `
            <!DOCTYPE html>
            <html lang="en">
              <head>
                <meta charset="UTF-8">
                <meta name="viewport" content="width=device-width, initial-scale=1.0">
                <meta
                  http-equiv="Content-Security-Policy"
                  content="default-src 'none'; img-src ${webview.cspSource} https:; script-src 'nonce-${nonce}'; style-src ${webview.cspSource} 'nonce-${nonce}'; style-src-elem ${webview.cspSource} 'unsafe-inline'; font-src ${webview.cspSource};"
                />
                <link href="${codiconsUri}" rel="stylesheet" nonce="${nonce}">
              </head>
              <body>
                <vscode-data-grid id="resource-table" aria-label="Basic" generate-header="sticky" aria-label="Sticky Header"></vscode-data-grid>
                <vscode-button id="add-resource-button">
                  Add New Resource
                  <span slot="start" class="codicon codicon-add"></span>
                </vscode-button>
                <script type="module" nonce="${nonce}" src="${webviewUri}"></script>
              </body>
            </html>
          `;
}
}
This serves as the HTML ‘shell’ and then the actual interaction is via the webview.js you see being included. Some special things here or just how it includes the correct link to the js/css files I need but also notice the Content-Security-Policy. That was interesting to get right initially but it’s a recommendation solid meta tag to include (otherwise console will spit out warnings to anyone looking). The webview.js is basically any JavaScript I needed to interact with my editor. Specifically this uses the registration of the Webview UI Toolkit and converts the resx to json and back (using the npm library resx). Here’s a snippet of that code in the custom editor provider that basically updates the document to JSON format as it changes:
private async updateTextDocument(document: vscode.TextDocument, json: any) {

  const edit = new vscode.WorkspaceEdit();

  edit.replace(
    document.uri,
    new vscode.Range(0, 0, document.lineCount, 0),
    await resx.js2resx(JSON.parse(json)));
  return vscode.workspace.applyEdit(edit);
}
So that gets the essence of the ‘bones’ of the editor that I needed. Once I had the data then a function in the webview.js can ‘bind’ the data to the vscode-data-grid supplying the column names + data easily and just set as the data rows quickly (lines 20,21):
function updateContent(/** @type {string} **/ text) {
    if (text) {

        var resxValues = [];

        let json;
        try {
            json = JSON.parse(text);
        }
        catch
        {
            console.log("error parsing json");
            return;
        }

        for (const node in json || []) {
            if (node) {
                let res = json[node];
                // eslint-disable-next-line @typescript-eslint/naming-convention
                var item = { Key: node, "Value": res.value || '', "Comment": res.comment || '' };
                resxValues.push(item);
            }
            else {
                console.log('node is undefined or null');
            }
        }

        table.rowsData = resxValues;
    }
    else {
        console.log("text is null");
        return;
    }
}
And the vscode-data-grid generates the rows, sticky header, handles the scrolling, theming, responding to environment, etc. for me!

Now I want to edit…
Editing in the vscode-data-grid
The default data-grid does NOT provide editing capabilities unfortunately and I really didn’t want to have to invent something here and end up not getting the value from all the Webview UI Toolkit. Luckily some in the universe also tackling the same problem. Thankfully Liam Barry was at the same time trying to solve the same problem and helped contribute what I needed. It works and provides a simple editing experience:

Now that I can edit can I delete?
Deleting items in the grid
Maybe you made an error and you want to delete. I decided to expose a command that can be invoked from the command palette but also from a context menu. I specifically chose not to put an “X” or delete button per-row…it didn’t feel like the right UX. Once I created the command (which basically gets the element and then the _rowData from the vscode-data-grid element (yay, that was awesome the context is set for me!!). Then I just remove it from the items array and update the doc. The code is okay, but the experience is simple exposing as a right-click context menu:

This is exposed by enabling the command on the webview context menu via package.json – notice on line 2 is where it is exposed on the context menu and the conditions of which it is exposed (a specific config value and ensuring that my editor is the active one):
"menus": {
  "webview/context": [
    {
      "command": "resx-editor.deleteResource",
      "when": "config.resx-editor.experimentalDelete == true && activeCustomEditorId == 'resx-editor.editor'"
    }
  ]
...
}
Deleting done, now add a new one!
Adding a new item
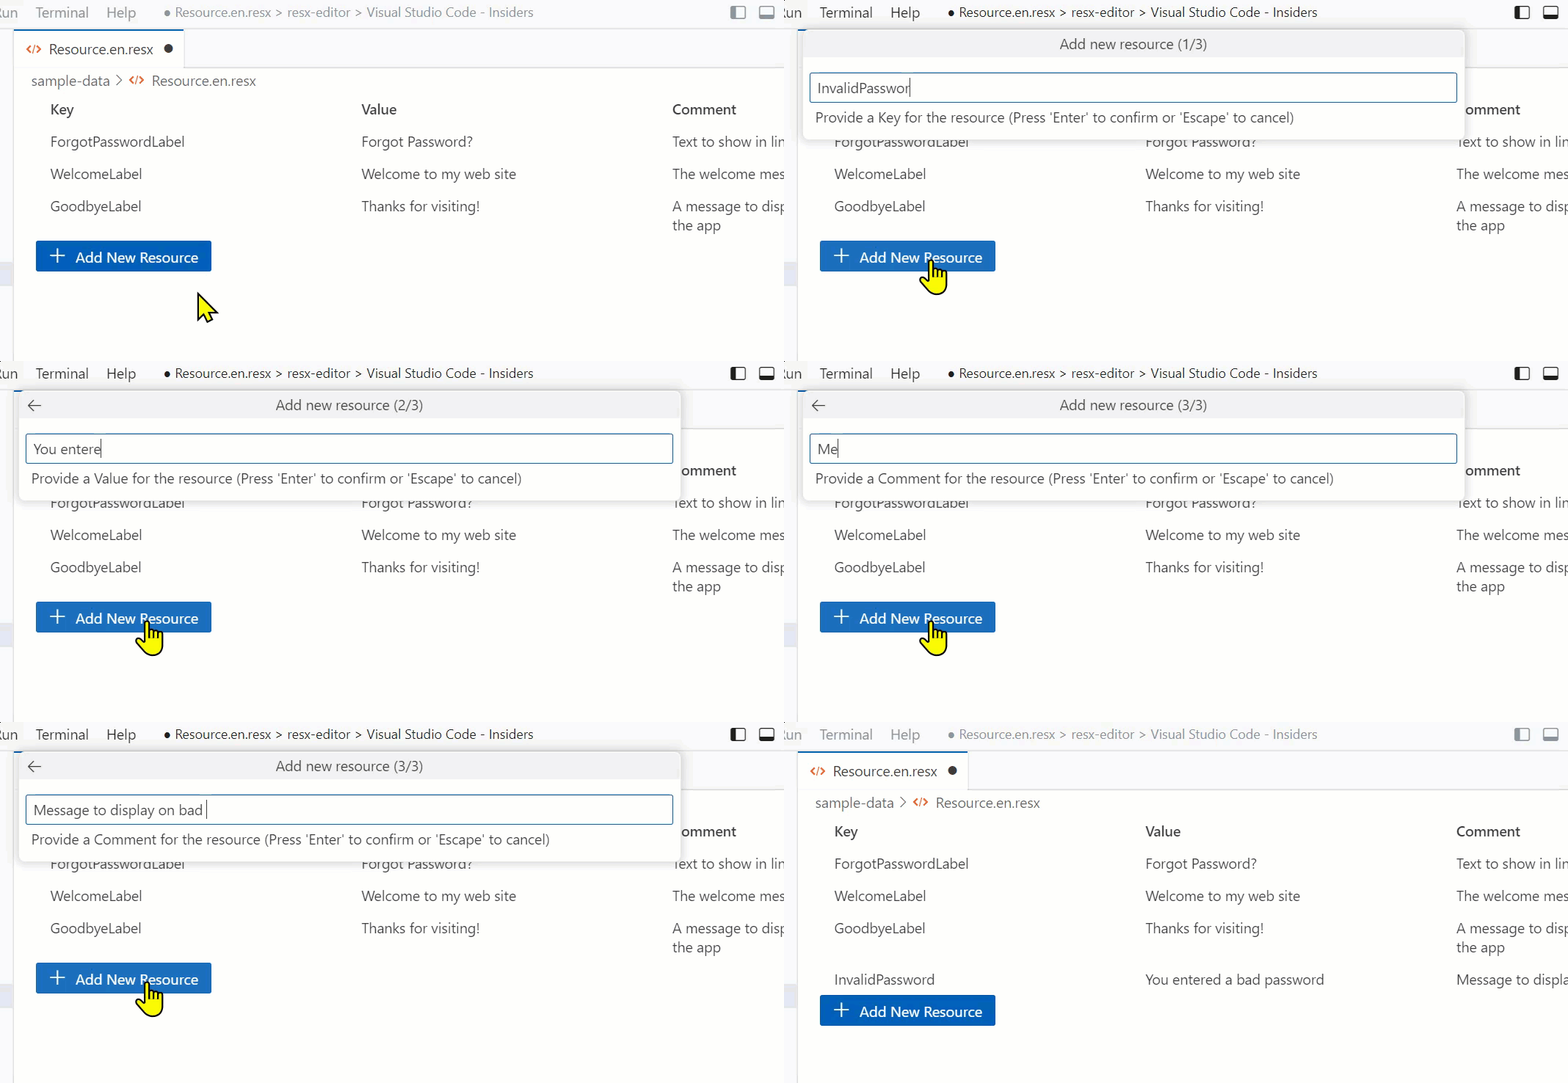
Obviously you want to add one! So I want to capture input…but don’t want to do a ‘form’ as that doesn’t feel like the VS Code way. I chose to use a multi-input method using the command area to capture the flow. This can be invoked from the button you see but also from the command palette command itself.

Simple enough, it captures the inputs and adds a new item to the data array and the document is updated again.
Using the default editor
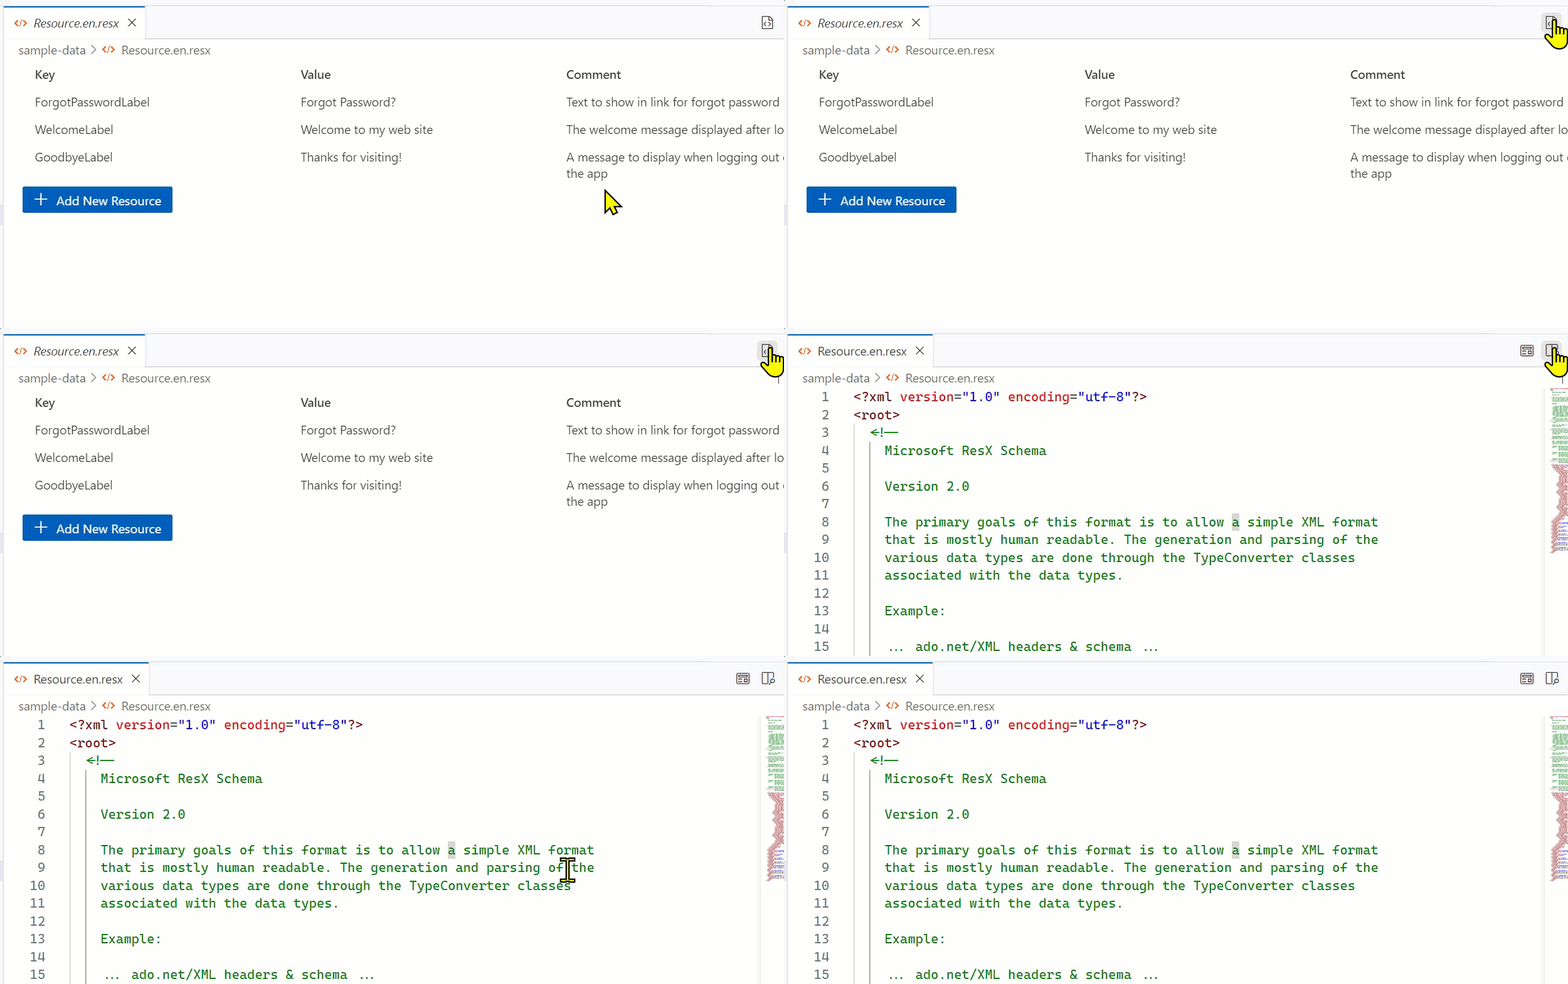
While custom editors are great, there may be times you want to use the default editor. This can be done by doing “open with” on the file from Explorer view, but I wanted to provide a quicker method from my custom editor. I added a command that re-opens the active document in the text editor:
let openInTextEditorCommand = vscode.commands.registerCommand(AppConstants.openInTextEditorCommand, () => {
  vscode.commands.executeCommand('workbench.action.reopenTextEditor', document?.uri);
});
and expose that command in the editor title context menu (package.json entry):
"editor/title": [
{
  "command": "resx-editor.openInTextEditor",
  "when": "activeCustomEditorId == 'resx-editor.editor' && activeEditorIsNotPreview == false",
  "group": "navigation@1"
}
...
]
Here’s the experience:

Helpful way to toggle back to the ‘raw’ view.
Using the custom editor as a previewer
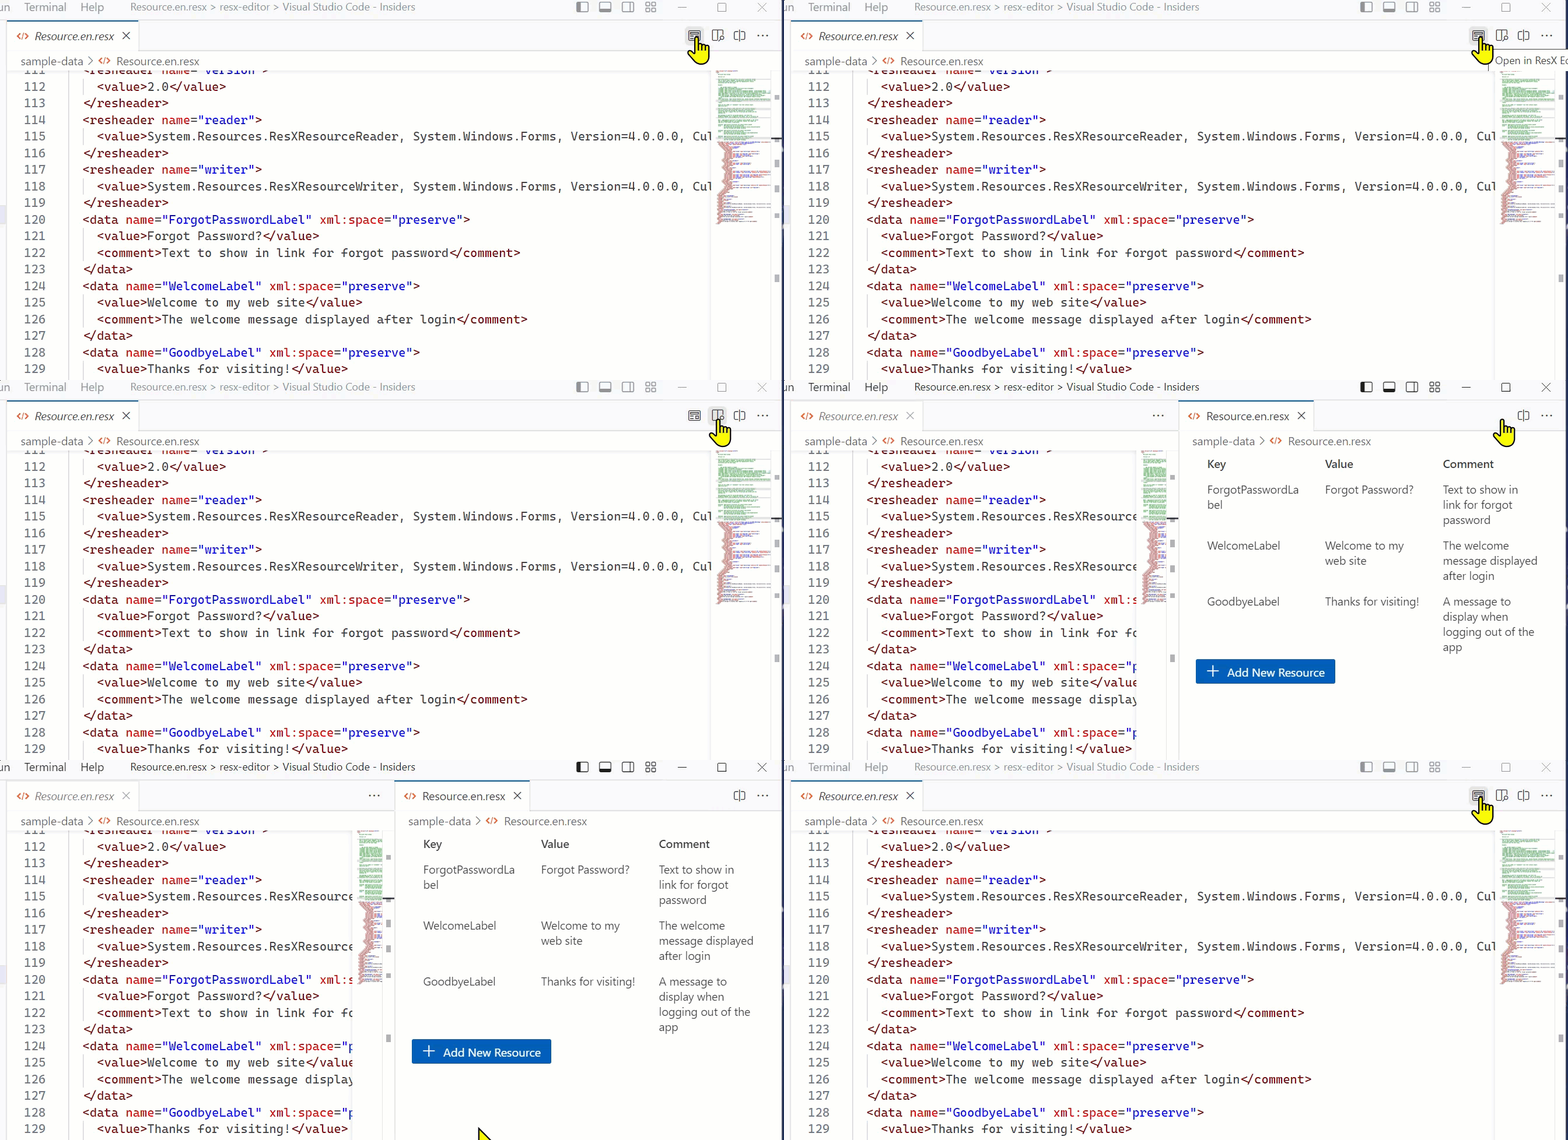
But what if you are in the raw view and want to see the formatted one? This may be common for standard formats where users do NOT have your editor set as default. You can expose a preview mode for yours and similarly, expose a button on the editor to preview it. This is what I’ve done here in package.json:
"editor/title": [
...
{
  "command": "resx-editor.openPreview",
  "when": "(resourceExtname == '.resx' || resourceExtname == '.resw') && activeCustomEditorId != 'resx-editor.editor'",
  "group": "navigation@1"
}
...
]
And the command that is used to open a document in my specific editor:
let openInResxEditor = vscode.commands.registerCommand(AppConstants.openInResxEditorCommand, () => {

    const editor = vscode.window.activeTextEditor;

    vscode.commands.executeCommand('vscode.openWith',
        editor?.document?.uri,
        AppConstants.viewTypeId,
        {
            preview: false,
            viewColumn: vscode.ViewColumn.Active
        });
});
Now I’ve got a different ways to see the raw view, preview, or default structured custom view.

Nice!
Check out the codez
As I mentioned earlier this is hardly an original idea, but I liked learning, using a standard UX and trying to make sure it felt like it fit within the VS Code experience. So go ahead and give it an install and play around. It is not perfect and comes with the ‘works on my machine’ guarantee.

The code is out there and linked in the Marketplace listing for you.
Please enjoy some of these other recent posts...
Comments