Writing an OpenAI plugin for ChatGPT using ASP.NET Core
| CommentsWell it was all about AI at Microsoft Build this year for sure…lots of great discussions and demos around GitHub Copilot, OpenAI, Intelligent Apps, etc. I’ve been heavily relying on GitHub Copilot recently as I’ve been spending more time in writing VS Code extensions and I’m not as familiar with TypeScript. Having that AI assistant with me *in the editor* has been amazing.
One of the sessions at Build was the keynote from Scott Guthrie where VP of Product, Amanda Silver, demonstrated building an OpenAI plugin for ChatGPT. You can watch that demo starting at this timestamp as it was a part of the “Next generation AI for developers with the Microsoft Cloud” overall keynote. It takes a simple API about products from the very famous Contoso outlet and exposes an API about products. Amanda then created a plugin using Python and showed the workflow of getting this to work in ChatGPT. So after a little prompting on Twitter and some change of weekend plans, I wanted to see what it would take to do this using ASP.NET Core API development. Turns out it is pretty simple, so let’s dig in!
Working with ChatGPT plugins
A plugin in this case help connect the famous ChatGPT experience to third-party applications (APIs). From the documentation:
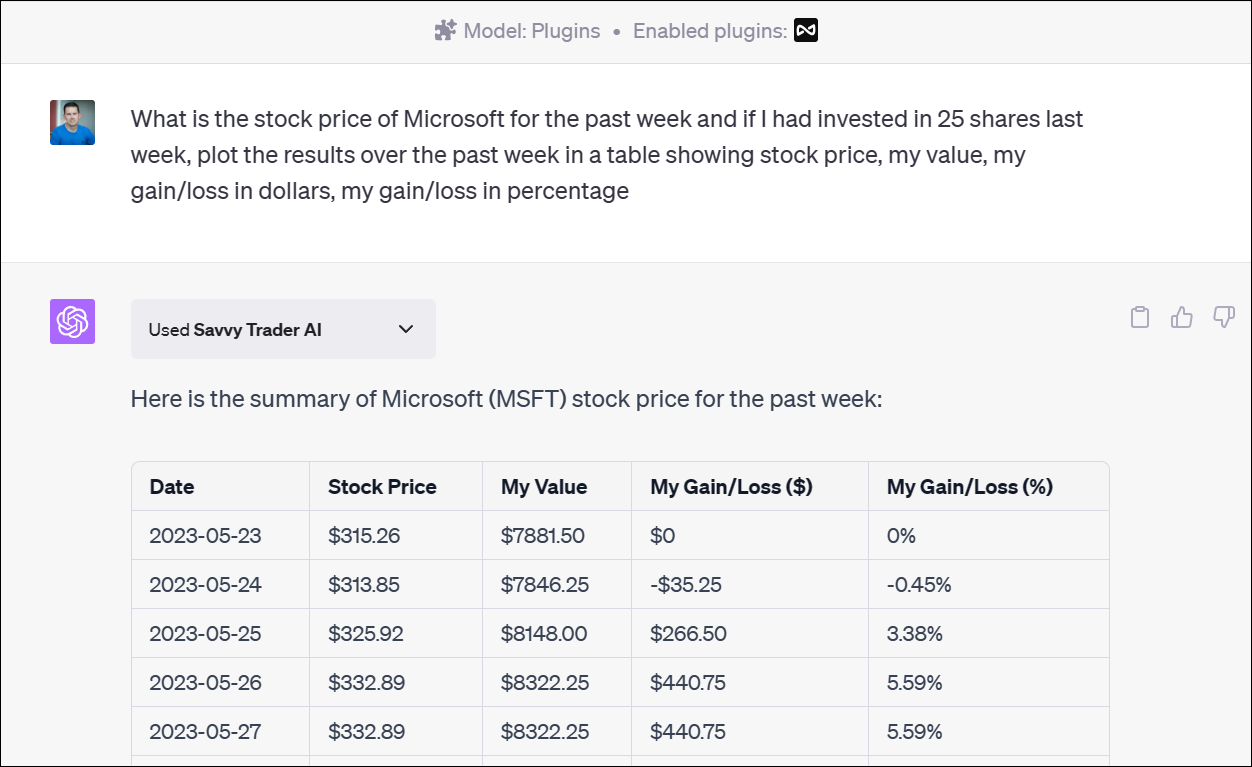
These plugins enable ChatGPT to interact with APIs defined by developers, enhancing ChatGPT's capabilities and allowing it to perform a wide range of actions. For example, here is the Savvy Trader ChatGPT plugin in action where I can ask it investment questions and it becomes the responsible source for providing the data/answers to my natural language inquiry:
A basic plugin is a definition of a manifest that describe how ChatGPT should interact with the third-party API. It’s a contract between ChatGPT, the plugin, and the API specification, using OpenAPI. That’s it simply. Could your existing APIs ‘just work’ as a plugin API? That’s something you’d have to consider before just randomly exposing your whole API surface area to ChatGPT. It makes more sense to be intentional about it and deliver a set of APIs that are meaningful to the AI model to look and receive a response. With that said, we’ll keep on the demo/simple path for now.
For now the ChatGPT plugins require two sides: a ChatGPT Plus subscription to use them (plugins now available to all Plus subscribers) and to develop you need to be on the approved list, for which you must join the waitlist to develop/deploy a plugin (as of the date of this writing).
Writing the API
Now the cool thing for .NET developers, namely ASP.NET Core developers is writing your API doesn’t require anything new for you to learn…it’s just your code. Can it be enhanced with more? Absolutely, but as you’ll see here, we are literally keeping it simple. For ours we’ll start with the simple ASP.NET Core Web API template in Visual Studio (or `dotnet new webapi –use-minimal-apis`). This gives us the simple starting point for our API. We’re going to follow the same sample as Amanda’s so you can delete all the weather forecast sample information in Program.cs. We’re going to add in some sample fake data (products.json) which we’ll load as our ‘data source’ for the API for now. We’ll load that up first:
// get some fake data
List<Product> products = JsonSerializer.Deserialize<List<Product>>(File.ReadAllText("./Data/products.json"));
Observe that I have a Product class to deserialize into, which is pretty simple class that maps to the sample data…not terribly important for this reading.
Now we want to have our OpenAPI definition crafted a little, so we’re going to modify the Swagger definition a bit. The template already includes Swashbuckle package to help us generate the OpenAPI specification needed…we just need to provide it with a bit of information. I’m going to modify this to provide the title/description a bit better (otherwise by default it uses a set of project names you probably don’t want).
builder.Services.AddSwaggerGen(c =>
{
    c.SwaggerDoc("v1", new Microsoft.OpenApi.Models.OpenApiInfo() { Title = "Contoso Product Search", Version = "v1", Description = "Search through Contoso's wide range of outdoor and recreational products." });
});
Now we’ll add an API for products to query our data and expose that to OpenAPI definition:
app.MapGet("/products", (string? query = null) =>
{
    if (query != null) {
        return products?.Where(p => p.Name.Contains(query, StringComparison.OrdinalIgnoreCase) ||
        p.Description.Contains(query, StringComparison.OrdinalIgnoreCase) ||
        p.Category.Contains(query, StringComparison.OrdinalIgnoreCase) );
    }

    return products;
})
.WithName("GetProducts")
.WithDescription("Get a list of products")
.WithOpenApi();
That’s it. You can see the highlighted lines where we further annotate the endpoint for the OpenAPI specification. Now we have our API working and it will produce an OpenAPI spec by default at {host}/swagger/v1/swagger.yaml for us. Note that you can further modify this location if you want providing a different route template in the Swagger config.
Now let’s move on to exposing this for ChatGPT plugins!
Exposing the API to ChatGPT
Plugins are enabled in ChatGPT by first providing a manifest that informs ChatGPT about what the plugin is, where the API definitions are, etc. This is requested at a manifest located at {yourdomain}/.well-known/ai-plugin.json. This is a well-known location and it is looking for a response that conforms to the schema. Here are some advanced scenarios for authentication for a plugin, but we’ll keep it simple and expose this for all with no auth needed. Details about the plugin manifest can be found here: ai-plugin.json manifest definition. It’s a pretty simple file. You probably will need a logo for your plugin of course – maybe use AI to generate that for you ;-).
There are a few ways you can expose this. You can simply add a wwwroot folder, enable static files and drop the file in wwwroot\.well-known\ai-plugin.json. To do that in your API project create the wwwroot folder, then create the .well-known folder (with the ‘.’) and put your ai-plugin.json file in that location. If you go this approach you’ll want to ensure in your Program.cs you enable static files:
app.UseStaticFiles();
After you have all this in place you’ll need to enable CORS policy so that the ChatGPT can access your API correctly. First you will need to enable CORS (line 1 in your builder) and then configure a policy for the ChatGPT domain (line 6 in the app):
builder.Services.AddCors();

...


app.UseCors(policy => policy
    .WithOrigins("https://chat.openai.com")
    .AllowAnyMethod()
    .AllowAnyHeader());
Now our API will be callable form the ChatGPT app.
Using Middleware to configure the manifest
As mentioned the static files approach for exposing the manifest is the simplest…but that’s no fun right? We are developers!!! As I was looking at this myself, I put together a piece of ASP.NET middleware to help me configure it. You can use the static files approach (in fact you’ll have to do that with your logo if hosting at the same place as your API) for sure, but just in case here’s a middleware approach that I put together. First you’ll install the package TimHeuer.OpenAIPluginMiddleware from NuGet. Once you’ve done that now you’ll add the service and tell the pipeline to use it. First add it to the services of the builder (line 1) and then tell the app to use the middleware (line 15):
builder.Services.AddAiPluginGen(options =>
{
    options.NameForHuman = "Contoso Product Search";
    options.NameForModel = "contosoproducts";
    options.LegalInfoUrl = "https://www.microsoft.com/en-us/legal/";
    options.ContactEmail = "[email protected]";
    options.LogoUrl = "/logo.png";
    options.DescriptionForHuman = "Search through Contoso's wide range of outdoor and recreational products.";
    options.DescriptionForModel = "Plugin for searching through Contoso's outdoor and recreational products. Use it whenever a user asks about products or activities related to camping, hiking, climbing or camping.";
    options.ApiDefinition = new Api() { RelativeUrl = "/swagger/v1/swagger.yaml" };
});

...

app.UseAiPluginGen();
This might be overkill, but now your API will respond to /.well-known/ai-plugin.json automatically without having to use the static files manifest approach. This comes in handy for any dynamic configuration of your manifest (and was the reason I created it).
Putting it together
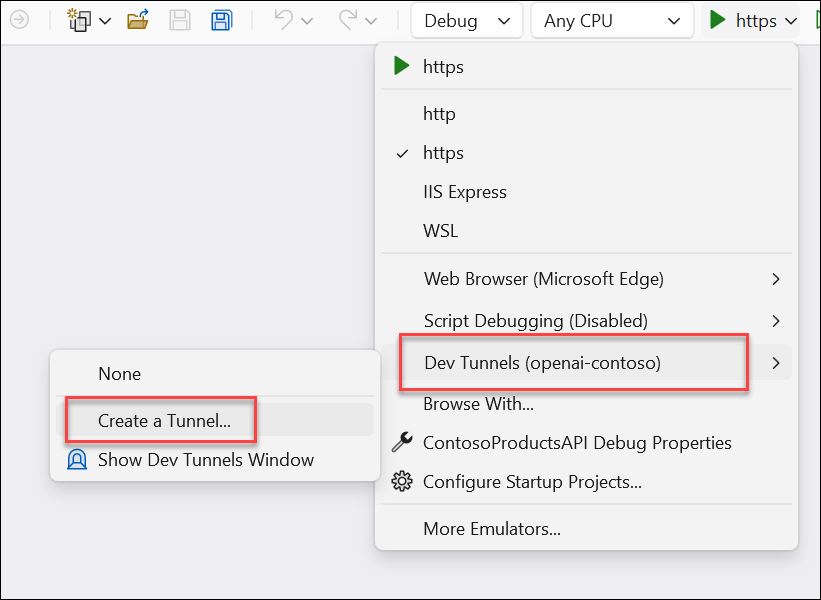
With all this in place, now we go to ChatGPT (remember, need a Plus subscription) and add our plugin. Since ChatGPT is a public site and we haven’t deployed our app yet to anywhere, we need to be able to have ChatGPT call it. Visual Studio Dev Tunnels to the rescue! If you haven’t heard about these yet, it is the fastest and most convenient way to get a public tunnel to your dev machine right from within Visual Studio! In fact, this scenario is exactly what Dev Tunnels are for! In our project we’ll create a tunnel first, and make it available to everyone (ChatGPT needs public access). In VS first create a tunnel, you can do that easily from the ‘start’ button of your API in the toolbar:

and then configure the options:

More details on these options are available at the documentation for Dev Tunnels, but these are the options I’m choosing. Now once I have that the tunnel will be activated and when I run the project from within Visual Studio, it will launch under the Dev Tunnel proxy:

You can see my app running, responding to the /.well-known/ai-plugin.json request and serving it from a public URL. Now let’s make it known to ChatGPT…
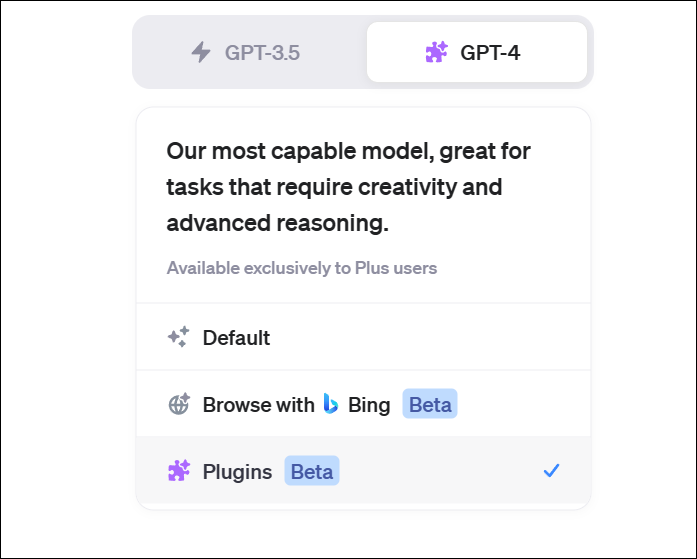
First navigate to https://chat.openai.com and ensure you choose the GPT-4 approach then plugins:

Once there you will see the option to specify plugins in the drop-down and then navigate to the plugin store:

Click that and choose ‘Develop your own plugin’ where you will be asked to put in a URL. This is where your manifest will respond to (just need the root URL). Again, because this needs to be public, Visual Studio Dev Tunnels will help you! I put in the URL to my dev tunnel and click next through the process (because this is development you’ll see a few things about warnings etc):

After that your plugin will be enabled and now I can issue a query to it and watch it work! Because I’m using Visual Studio Dev Tunnels I can also set a breakpoint in my C# code and see it happening live, inspect, etc:

A very fast way to debug my plugin before I’m fully ready for deployment!
Sample code
And now you have it. Now you could actually deploy your plugin to Azure Container Apps for scale and you are ready to let everyone get recommendations on backpacks and hiking shoes from Contoso! I’ve put all of this together (including some Azure deployment infrastructure scripts) in this sample repo: timheuer/openai-plugin-aspnetcore. This uses the middleware that I created for the manifest. That repo is located at timheuer/openai-plugin-middleware and I’d love to hear comments on the usefulness here. There is some added code in that repo that dynamically changes some of the routes to handle the Dev Tunnel proxy URL for development.
Hope this helps see the end to end of a very simple plugin using ASP.NET Core, Visual Studio, and ChatGPT with plugins!
Please enjoy some of these other recent posts...

Comments