Creating Visual Studio Extension Files (VSIX) for Template Deployment
| Comments- | Posted in
- visual studio
- seesmic
- vsix
- vsi
- extension manager
While working on some plugins for the new Seesmic Desktop Platform I got sick of copying and pasting some boiler plate code over and over. I had created some helper templates for myself so that I could say File…New Seesmic Desktop Plugin and get everything I needed initially. This weekend I had some time and formalized those templates into an easy-to-use installer for anyone to consume.
NOTE: It is likely that Seesmic themselves will create developer project/item templates…these were for my own use and I shared them on the Seesmic Desktop Platform developer forum for anyone to benefit from (or ignore). They are not the official templates from Seesmic.
Prior to VS2010 you could create what is called a Visual Studio Community Content Installer…which is a .VSI file that installs things like snippets, etc. And actually you can still do that today. The process is manual and involves a few XML manifest files, zipping up the contents and renaming it to .VSI (the VSI is just a ZIP format). It isn’t hard, but isn’t painless as well – it’s a lot of manual steps.
Enter VS2010 and the Visual Studio SDK. First, the items I am describing below require you to have the VS2010 SDK installed. It is NOT installed by default. Visual Studio 2010 has a file format called VSIX which is basically a Visual Studio Extension (VSX was already taken by Visio). This extension format is intended to be a one-stop installer format for all things extensible. Things like add-ins, etc. But it can also be used for simple things like Item and Project template types. Here’s what I did.
1. Starting the project
After you have VS2010 SDK installed, choose File…New VSIX Project
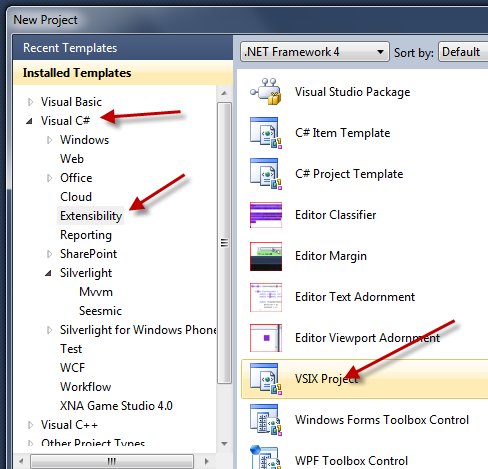
Note that this is under a language area (C# or Visual Basic). This is because there is some assumption that you are creating more than just a template deployer…but just note that. In my instance it actually didn’t matter what language area I chose.
2. Removing ‘binary’ packages
By default the VSIX project thinks you are going to be creating code extensions and will package the project’s DLL and PDB files as a part of your extension. If you are using this process as I was for template extensions, this is not necessary. There is an easy way of avoiding this. Open up the csproj file (or vbproj) you just created in notepad and add these lines in the XML file:
1: <PropertyGroup>
2: <CopyBuildOutputToOutputDirectory>false</CopyBuildOutputToOutputDirectory>
3: <CopyOutputSymbolsToOutputDirectory>false</CopyOutputSymbolsToOutputDirectory>
4: </PropertyGroup>
This tells the compiler to not package those types of files into our extension. I put these below my last PropertyGroup statement in the file. Save the proj file. If you return to Visual Studio (and had the project open while making these edits in notepad) you’ll be alerted to reload the project, go ahead and reload baby.
3. Editing the manfiest information
When you create the project it will open up with a dialog that is a visual editor to the core manifest. This is where you will put your metadata as well as begin to add your content. Here is a snapshot of mine:
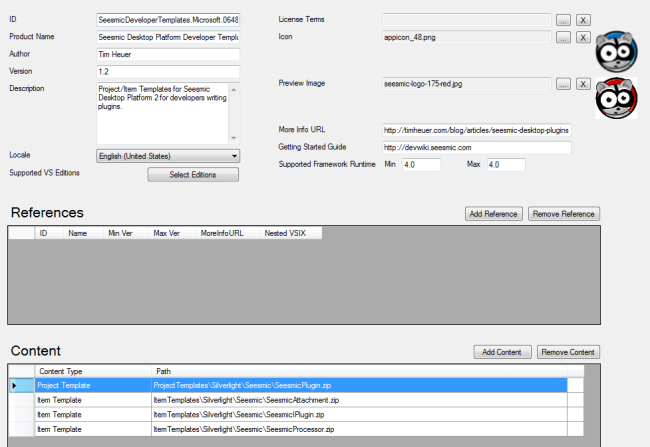
Notice the simple metadata information (name, author, version, etc.). This is important information that I’d highly recommend to include as you’ll see why in later steps.
Notice the Content area in the bottom. This is where you’ll add your content. If you have a blank project you will click the Add Content button and choose the type (in my case Project Template and Item Template) and browse to the file. Note that this copies that file to this project…not a reference. So if you change the file outside of this project, you’ll want to update it again. Do this for each template type you want to deploy.
4. Understanding Path information for templates
Notice my path of my templates:

This is important because it will determine how the templates are structured in Visual Studio after the user installs them. My path above results in this:
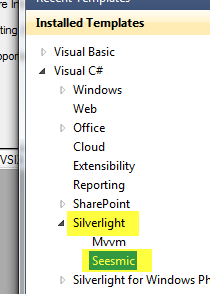
This enables my users to find it under Silverlight as well as the custom branch that I have specified. This is a helpful tip to your users and provides a more professional look in my opinion.
5. Building the VSIX file
This step is easy. F5. It’s the same build process as any other project type. The result is a VSIX file. When the user double-clicks on that (and has Visual Studio installed) they’ll see your dialog:
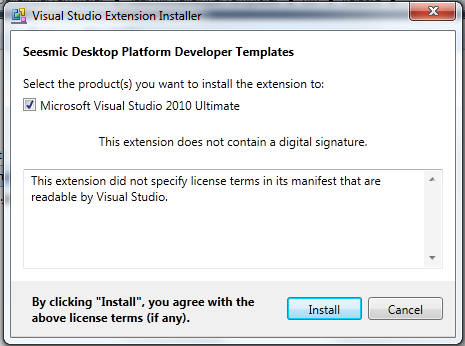
You could optionally digitally sign your VSIX file so the ‘unidentified publisher’ statement isn’t there.
6. Making your VSIX Discoverable
This is the fun part. Now that you have a standard Visual Studio Extension, you can make it readily available to any Visual Studio developer. You could simply post a link to it on your blog, have the user download the VSIX and that is acceptable. But you can also make it available in Visual Studio’s online gallery which then becomes searchable and seamlessly installable by end users.
Visit the Visual Studio Gallery page to start the process. Notice the Upload button in the upper right area…that is where you start. After authenticating with Windows Live ID, it is a 3 step process:
- Determine what type (Tool, Control, Template)
- Upload the VSIX
- Edit and annotate further criteria
The first two steps are simple, in my case I chose Template, then uploaded my VSIX which goes through some steps of validation making sure it is a valid VSIX file. The final step enables you to specify more data that is annotating your extension to make it more searchable. Here was my page.
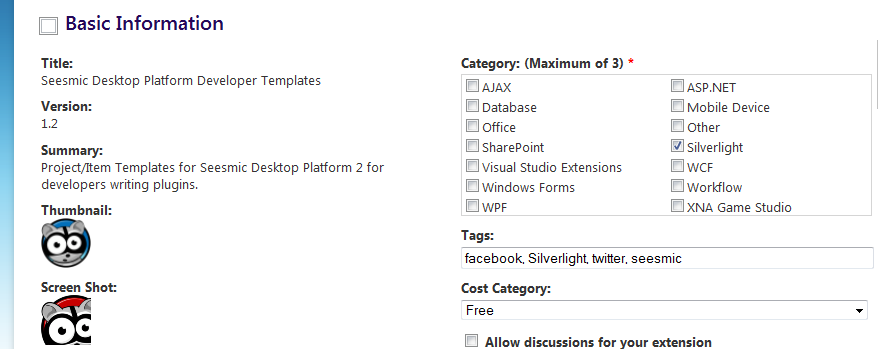
Notice the tags I added to help it be discoverable? Now users can – from within Visual Studio 2010 – search and install extensions immediately:

Any installed extensions show up in the Extension Manager (Tools menu) for easy disabling or uninstalling).
Summary
After this quick process I have a distributed package for my community as well as now have added templates to my development environment making it easy to create new extensions for Seesmic (my sample used here):
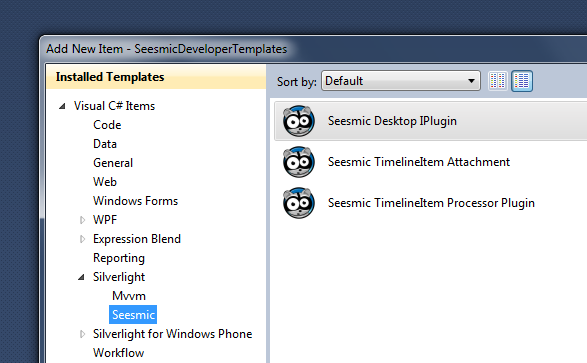
It was fairly simple and I love that it is integrated into Visual Studio 2010 for everyone now!
Hope this helps!
Please enjoy some of these other recent posts...
Comments