Contain your excitement for ASP.NET on Azure
| CommentsOkay, so I won’t quit my day job in favor of trying to come up with a witty title for a blog post. But this is one thing that I’m proud to see our team deliver: one of the fastest ways to get your ASP.NET app to a container service on Azure (or elsewhere) without having to know what containers are or learn new things. No really!
Cloud native
Well if you operate in the modern web world you’ve heard this term ‘cloud native’ before. And everyone has an opinion on what it means. I’m not here to pick sides and I think it means a lot of different things. One commonality it seems that most can agree on is that one aspect is of deploying a service to the cloud as ‘cloud native’ is to leverage containers. If you aren’t familiar with containers, go read here: What is a container? It’s a good primer on what they are technically but also some benefits. Once you educate yourself you’ll be able to declare yourself worthy to nod your head in cloud native conversations and every once in a while throw out comments like “Yeah, containers will help here for us.” or something like that. Instantly you will be seen as smart and an authority and the accolades will start pouring in. But then you may actually have to do something about it in your job/app. Hey don’t blame me, you brought this on yourself with those arrogant comments! Have no fear, Visual Studio is here to help!
Creating and deploying a container
If you haven’t spent time working with containers, you will be likely introduced to new concepts like Docker, Dockerfile, compose, and perhaps even YAML. In creating a container, you typically need to have a definition of what your container is, and generally this will be a Dockerfile. A typical Docker file for a .NET Web API looks like this:
#See https://aka.ms/customizecontainer to learn how to customize your debug container and how Visual Studio uses this Dockerfile to build your images for faster debugging.

FROM mcr.microsoft.com/dotnet/aspnet:7.0 AS base
WORKDIR /app
EXPOSE 80
EXPOSE 443

FROM mcr.microsoft.com/dotnet/sdk:7.0 AS build
WORKDIR /src
COPY ["CommerceApi.csproj", "."]
RUN dotnet restore "./CommerceApi.csproj"
COPY . .
WORKDIR "/src/."
RUN dotnet build "CommerceApi.csproj" -c Release -o /app/build

FROM build AS publish
RUN dotnet publish "CommerceApi.csproj" -c Release -o /app/publish /p:UseAppHost=false

FROM base AS final
WORKDIR /app
COPY --from=publish /app/publish .
ENTRYPOINT ["dotnet", "CommerceApi.dll"]
You can see a few concepts here that you’d have to understand and that’s not the purpose of this post. You’d then need to use Docker to build this container image and also to ‘push’ it to a container registry like Azure Container Registry (ACR). For a developer this would mean you’d likely have Docker Desktop installed that brings these set of tools to you locally to execute within your developer workflow. As you develop your solution, you’ll have to keep your Dockerfile updated if it involves more projects, version changes, path changes, etc. But what if you just have a simple service, you’ve heard about containers and you just want to get it to a container service as fast as possible and simple. Well, in Visual Studio we have you covered.
Publish
Yeah yeah, ‘friends don’t let friends…’ – c’mon let people be (more on that later). In VS we have a great set of tools to help you rapidly get your code to various deployment endpoints. Since containers are ‘the thing’ lately as of this writing we want to help you remove concepts and get their fast as well…in partnership with Azure. Azure has a new service launched last year called Azure Container Apps (ACA), a managed container environment that helps you scale your app. It’s a great way to get started in container deployments easily and have manageability and scale. Let me show you how we help you get to ACA quickly, from your beloved IDE, with no need for a Dockerfile or other tools. You’ll start with your ASP.NET Web project and start from the Publish flow (yep, right-click publish). From their choose Azure and notice Azure Container Apps right there for you:
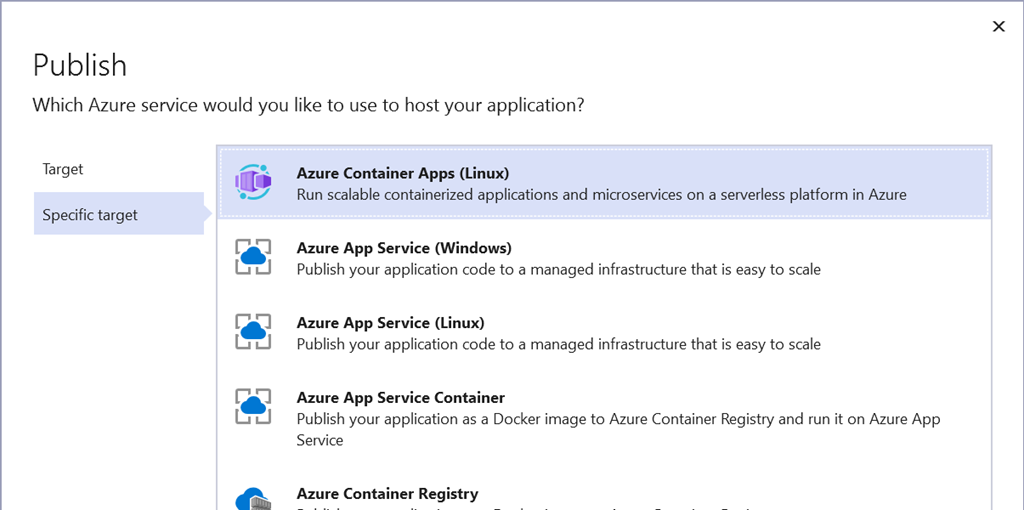
After selecting that Visual Studio (VS) will help you either select existing resources that your infrastructure team helped setup for you or, if you’d like and have access to create them, create new Azure resources all from within VS easily without having to go to the portal. You can then select your ACA instance:
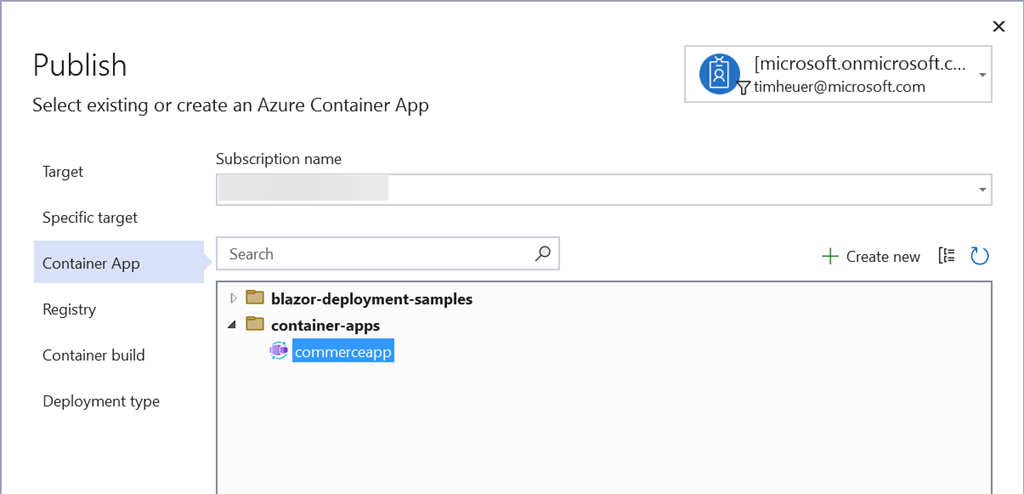
And then the container registry for your image:
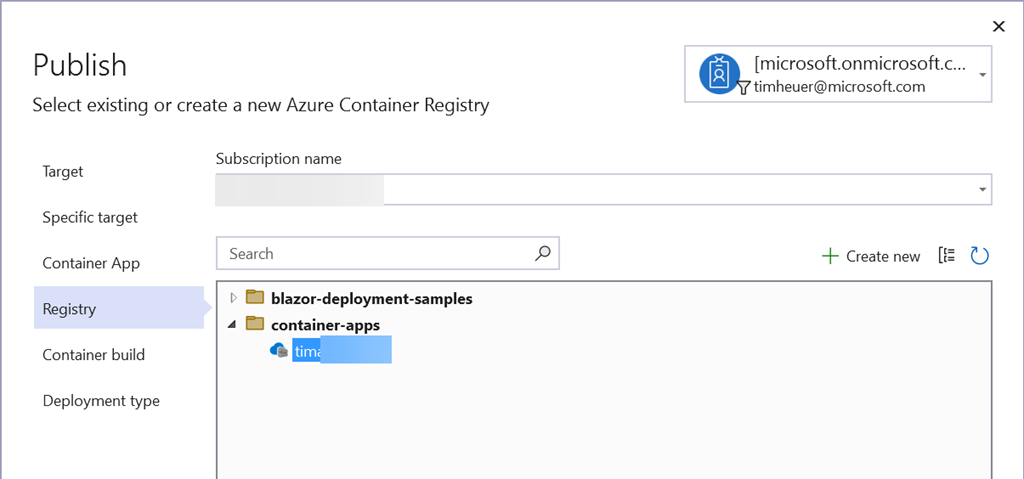
Now you’ll be presented with an option on how to build the container. Notice two options because we’re nice:
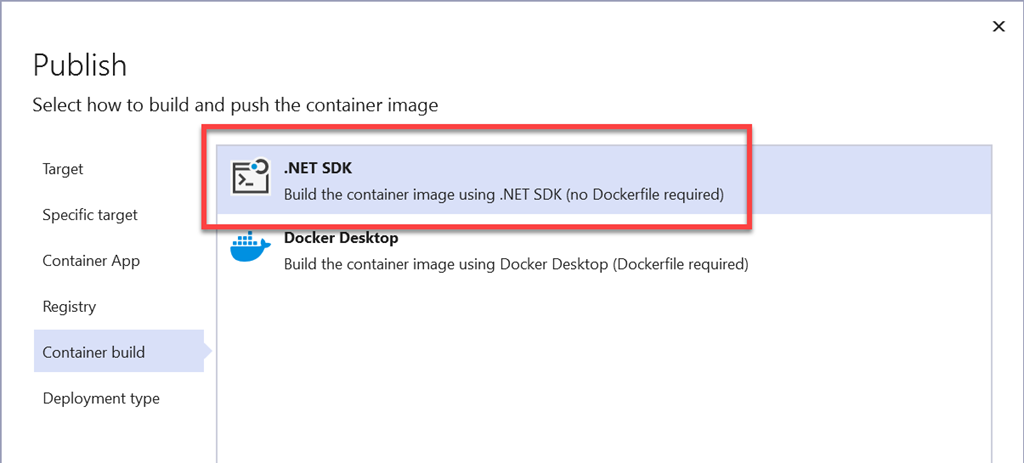
If you still have a Dockerfile and want to go that route (read below) we enable that for you as well. But the first option is leveraging the .NET SDK that you already have (using the publish targets for the SDK). Selecting this option will be the ‘fast path’ to your publishing adventure.
Then click finish and you’re done, you now have a profile ready to push a container image to a registry (ACR), then to a container app service (ACA) without having to create a Docker file, learn a new concept or have other tools. Click publish and you’ll see the completed results and you will now be able to strut back into your manager’s office/cube/open space bean bag and say Hey boss, our service is all containerized and in the cloud ready to scale…where’s my promo?

VS has helped with millions of cloud deployments every month whether they be to VMs, PaaS services, Web Deploy to on-metal cloud-hosted machines, and now easily to container services like ACA. It’s very helpful and fast, especially for those dev/test scenarios as you iterate on your app with others.
Leveraging continuous integration and deployment (CI/CD)
But Tim, friends don’t let friends right-click publish! Pfft, again I say, do what makes you happy and productive. But also, I agree ;-). Seriously though I’ve become a believer in CI/CD for EVERYTHING I do now, no matter the size of project. It just raises the confidence of repeatable builds and creates an environment of collaboration better for other things. And here’s the good thing, VS is going to help you bootstrap your efforts here easily as well – EVEN WITH CONTAINERS! Remember that step where we selected the SDK to build our container? Well if your VS project is within a GitHub repository (free for most cases these days, you should use it!), we’ll offer to generate an Actions workflow, which is GitHub’s CI/CD system:
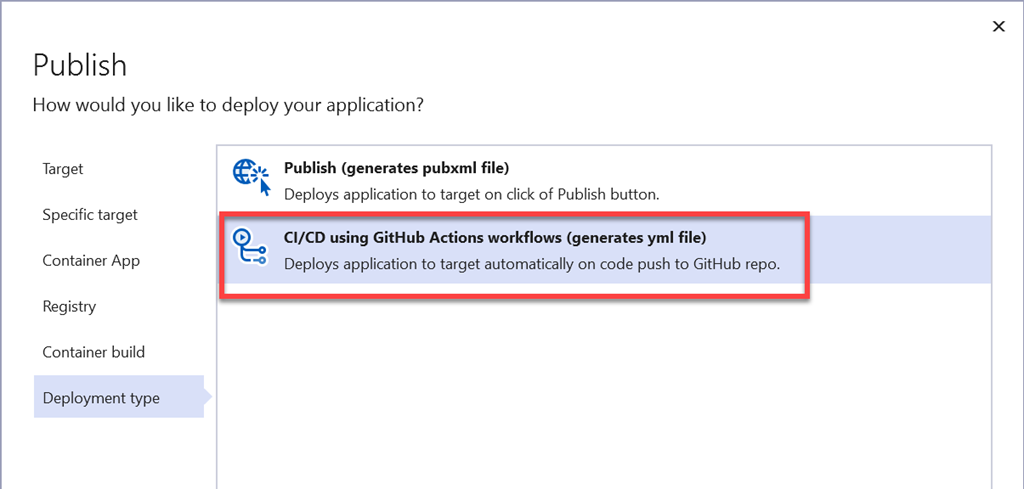
In choosing a CI/CD workflow, the CI system (in this case GitHub Actions) needs to know some more information: where to deploy, some credentials to use for deployment, etc. The cool thing is even in CI, Visual Studio will help you do all of this setup including retrieving and setting these values as secrets on your repo! Selecting this option would result in this summary for you:

And the resulting workflow in an Actions YAML file in your project:
name: Build and deploy .NET application to container app commerceapp
on:
  push:
    branches:
    - main
env:
  CONTAINER_APP_CONTAINER_NAME: commerceapi
  CONTAINER_APP_NAME: commerceapp
  CONTAINER_APP_RESOURCE_GROUP_NAME: container-apps
  CONTAINER_REGISTRY_LOGIN_SERVER: XXXXXXXXXXXX.azurecr.io
  DOTNET_CORE_VERSION: 7.0.x
  PROJECT_NAME_FOR_DOCKER: commerceapi
jobs:
  build:
    runs-on: ubuntu-latest
    steps:
    - name: Checkout to the branch
      uses: actions/checkout@v3
    - name: Setup .NET SDK
      uses: actions/[email protected]
      with:
        include-prerelease: True
        dotnet-version: ${{ env.DOTNET_CORE_VERSION }}
    - name: Log in to container registry
      uses: azure/docker-login@v1
      with:
        login-server: ${{ env.CONTAINER_REGISTRY_LOGIN_SERVER }}
        username: ${{ secrets.timacregistry_USERNAME_F84D }}
        password: ${{ secrets.timacregistry_PASSWORD_F84D }}
    - name: Build and push container image to registry
      run: dotnet publish -c Release -r linux-x64 -p:PublishProfile=DefaultContainer -p:ContainerImageTag=${{ github.sha }} --no-self-contained -p:ContainerRegistry=${{ env.CONTAINER_REGISTRY_LOGIN_SERVER }} -bl
    - name: Upload binlog for investigation
      uses: actions/upload-artifact@v3
      with:
        if-no-files-found: error
        name: binlog
        path: msbuild.binlog
  deploy:
    runs-on: ubuntu-latest
    needs: build
    steps:
    - name: Azure Login
      uses: azure/login@v1
      with:
        creds: ${{ secrets.commerceapp_SPN }}
    - name: Deploy to containerapp
      uses: azure/CLI@v1
      with:
        inlineScript: >
          az config set extension.use_dynamic_install=yes_without_prompt

          az containerapp registry set --name ${{ env.CONTAINER_APP_NAME }} --resource-group ${{ env.CONTAINER_APP_RESOURCE_GROUP_NAME }} --server ${{ env.CONTAINER_REGISTRY_LOGIN_SERVER }} --username ${{ secrets.timacregistry_USERNAME_F84D }} --password ${{ secrets.timacregistry_PASSWORD_F84D }}

          az containerapp update --name ${{ env.CONTAINER_APP_NAME }} --container-name ${{ env.CONTAINER_APP_CONTAINER_NAME }} --resource-group ${{ env.CONTAINER_APP_RESOURCE_GROUP_NAME }} --image ${{ env.CONTAINER_REGISTRY_LOGIN_SERVER }}/${{ env.PROJECT_NAME_FOR_DOCKER }}:${{ github.sha }}
    - name: logout
      run: >
        az logout
Boom! So now you CAN use right-click publish and still get started with CI/CD deploying to the cloud! Strut right back into that office: Hey boss, I took the extra step and setup our initial CI/CD workflow for the container service so the team can just focus on coding and checking it in…gonna take the rest of the week off.
Cool, but I have advanced needs…
Now, now I know there will be always cases where your needs are different, this is too simple, etc. and YOU ARE RIGHT! There are limitations to this approach which we outlined in our initial support for the SDK container build capabilities. Things like customizing your base container image, tag names, ports, etc. are all easily customizable in your project file as they feed into the build pipeline, so we have you covered on this type of customization. As your solution grows and your particular full microservices needs get more complex, you may outgrow this simplicity…we hope that means your app is hugely successful and profits are rolling in for your app! You’ll likely grow into the Dockerfile scenarios and that’s okay…you’ll have identified your needs and have already setup your starting CI/CD workflow that you can progressively also grow as needed. We will continue to listen and see about ways we can improve this capability as developers like you give us feedback!
Summary
Our goal in Visual Studio is to help you be productive with a range of tasks. Moving to ‘cloud native’ can be another thing that your team has to worry about and as you start your journey (or perhaps looking to simplify a bit) VS aims to be your partner there and continue to help you be productive in getting your code to the cloud quickly with as much friction removed from your normal workflow. Here’s a few links to read more in more corporate speak about these capabilities:
- Announcing built-in container support for the .NET SDK
- Tutorial: Deploy to Azure Container Apps using Visual Studio
- Dockerfile reference
- Azure Container Apps
- @VisualStudio team on Twitter
Thanks for reading!
Please enjoy some of these other recent posts...
Comments