Hosting Blazor WebAssembly in Azure Static Web Apps (Preview)
| CommentsAt Build the Azure team launched a new service called Azure Static Web Apps in preview. This service is tailored for scenarios that really work well when you have a static web site front-end and using things like serverless APIs for your communication to services/data/etc. You should read more about it here: Azure Static Web Apps .
Awesome, so Blazor WebAssembly (Wasm) is a static site right? Can you use this new service to host your Blazor Wasm app? Let’s find out!
NOTE: This is just an experiment for me. This isn’t any official stance of what may come with the service, but only what we can do now with Blazor apps. As you see with Azure Static Web Apps there is a big end-to-end there with functions, debug experience, etc. I just wanted to see if Blazor Wasm (as a static web app) could be pushed to the service.
As of this post the service is tailored toward JavaScript app development and works seamlessly in that setup. However, with a few tweaks (for now) we can get our Blazor app working. First we’ll need to get things setup!
Setting up your repo
The fundamental aspects of the service are deployment from your source in GitHub using GitHub Actions. So first you’ll need to make sure you have a repository on GitHub.com for your repository. I’m going to continue to use my Blazor Wasm Hosting Sample repo (which has different options as well to host Wasm apps) for this example. My app is the basic Blazor Wasm template, nothing fancy at all. Okay, we’ve got the repo set up, now let’s get the service setup.
Create the Azure Static Web App resource
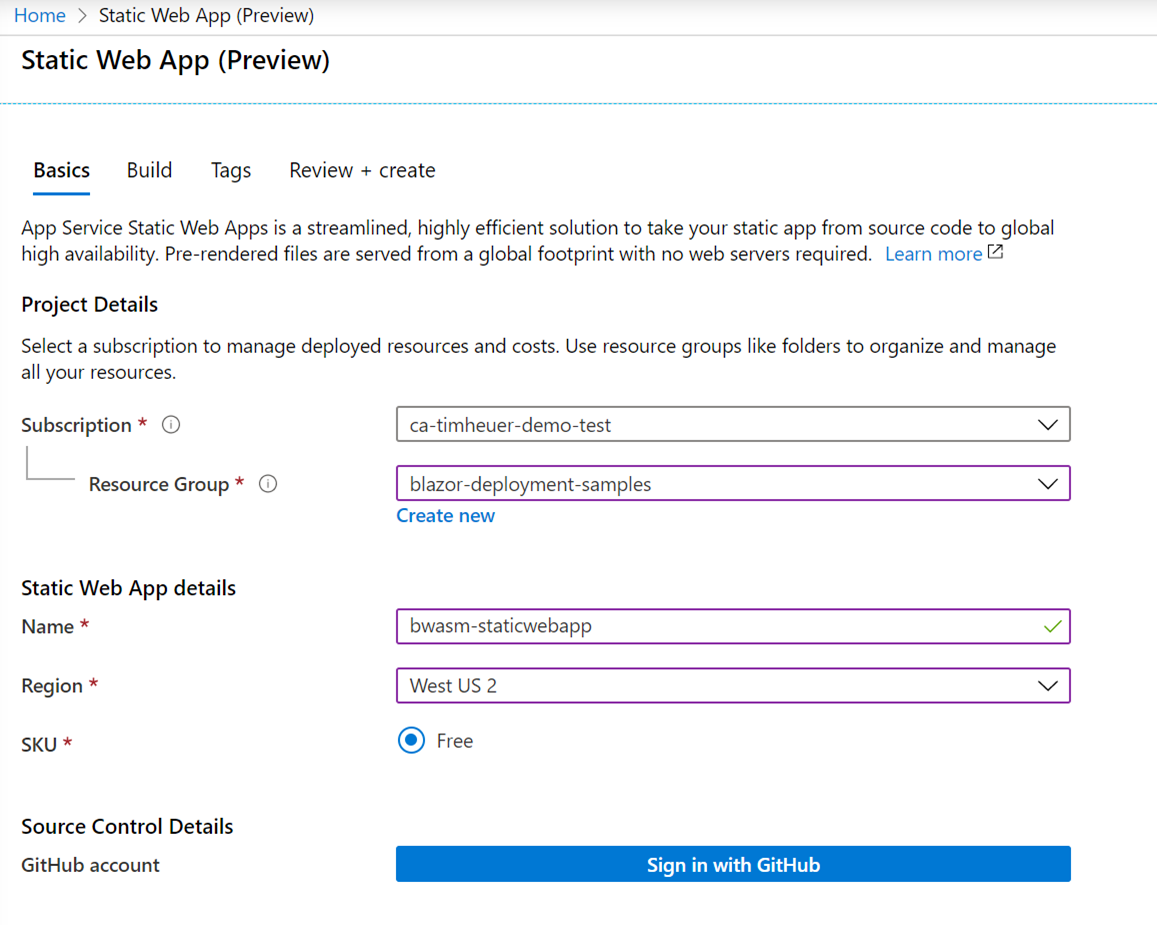
You’ll need an Azure account of course and if you don’t have one, you can create an Azure account for free. Go ahead and do that and then come back here to make it easier to follow along. Once you have the account you’ll log in to the Azure portal and create a new resource using the Static Web App (Preview) resource type. You’ll see a simple form to fill out a few things like your resource group and a name for your app and the region.

The last thing there is where you’ll connect to your GitHub repo and make selections for what repo to use. It will launch you to authorize Azure Static Web Apps to make changes to your repo (for workflow and adding secrets):

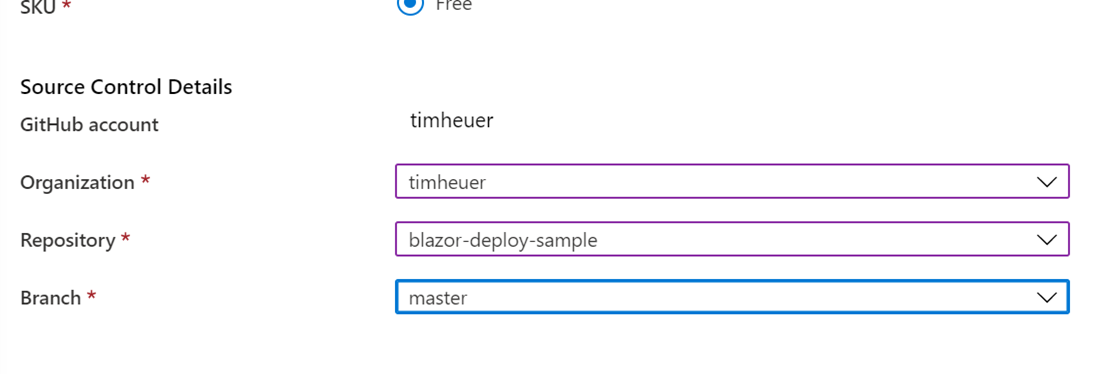
Once authorized then more options show for the resource creation and just choose your org/repo/branch:

Once you complete these selections, click Review+Create and the resource will create! The process will take a few minutes, but when complete you’ll have a resource with a few key bits of information:

The URL of your app is auto-generated with probably a name that will make you chuckle a bit. Hey, it’s random, don’t try to make sense of it, just let the names like “icy cliff” inspire you. Additionally you’ll see the “Workflow file” YAML file and link. If you click it (go ahead and do that) it will take us over to your repo and the GitHub Actions workflow file that was created. We’ll take a look at the details next, but for now if you navigate to the Actions tab of your repo, you’ll see a fail. This is expected for us right now in our steps…more on that later.

In addition to the Actions workflow navigate to the settings tab of your repo and choose Secrets. You’ll see a new secret (with that random name) was added to your repo.

This is the API token needed to communicate with the service.
Why can’t you see the token itself and give the secret a different name? Great question. For now just know that you can’t. Maybe this will change, but this is the secret name you’ll have to use. It’s cool though, the only place it is used is in your workflow file. Speaking of that file, let’s take a look more in detail now!
Understanding and modifying the Action
So the initial workflow file was created and added to your workflow has all the defaults. Namely we’re going to focus on the “jobs” node of the workflow, which should start about line 12. The previous portions in the workflow define the triggers which you can modify if you’d like but they are intended to be a part of your overall CI/CD flow with the static site (automatic PR closure, etc.). Let’s look at the jobs as-is:
jobs:
  build_and_deploy_job:
    if: github.event_name == 'push' || (github.event_name == 'pull_request' && github.event.action != 'closed')
    runs-on: ubuntu-latest
    name: Build and Deploy Job
    steps:
    - uses: actions/checkout@v2
    - name: Build And Deploy
      id: builddeploy
      uses: Azure/[email protected]
      with:
        azure_static_web_apps_api_token: ${{ secrets.AZURE_STATIC_WEB_APPS_API_TOKEN_ICY_CLIFF_XXXXXXXXX }}
        repo_token: ${{ secrets.GITHUB_TOKEN }} # Used for Github integrations (i.e. PR comments)
        action: 'upload'
        ###### Repository/Build Configurations - These values can be configured to match you app requirements. ######
        app_location: '/' # App source code path
        api_location: 'api' # Api source code path - optional
        app_artifact_location: '' # Built app content directory - optional
        ###### End of Repository/Build Configurations ######
Before we make changes, let’s just look. Oh see that parameter for api token? It’s using that secret that was added to your repo. GitHub Actions has built in a ‘secrets’ object that can reference those secrets and this is where that gets used. That is required for proper deployment. So there, that is where you can see the relationship to it being used!
This is great, but also was failing for our Blazor Wasm app. Why? Well because it’s trying to build it and doesn’t quite know how yet. That’s fine, we can help nudge it along! I’m going to make some changes here. First, change the checkout version to @v2 on Line 18. This is faster.
NOTE: I suspect this will change to be the default soon, but you can change it now to use v2
Now we need to get .NET SDK set up to build our Blazor app. So after the checkout step, let’s add another to first set up the .NET SDK we want to use. It will look like this, using the setup-dotnet action:
    - uses: actions/checkout@v2

    - name: Setup .NET SDK
      uses: actions/setup-dotnet@v1
      with:
        dotnet-version: 3.1.201
Now that we are setup, we need to build the Blazor app. So let’s add another step that explicitly builds the app and publish to a specific output location for easy reference in a later step!
    - uses: actions/checkout@v2

    - name: Setup .NET SDK
      uses: actions/setup-dotnet@v1
      with:
        dotnet-version: 3.1.201

    - name: Build App
      run: dotnet publish -c Release -o published
There, now we’ve got it building!
NOTE: I’m taking a bit of a shortcut in this tutorial and I’d recommend the actual best practice of Restore, Build, Test, Publish as separate steps. This allows you to more precisely see what is going on in your CI and clearly see what steps may fail, etc.
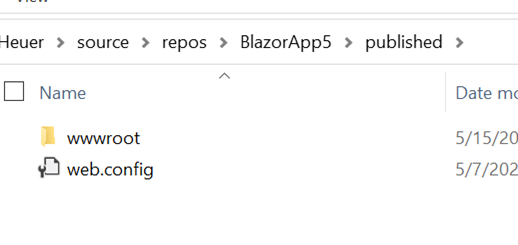
Our Blazor app is now build and prepared for static deployment in the location ‘published’ referenced in our ‘-o’ parameter during build. All the files we need start now at the root of that folder. A typical Blazor Wasm app published will have a web.config and a wwwroot at the published location.

Let’s get back to the action defaults. Head back to the YAML file and look for the ‘app_location’ parameter in the action. We now want to change that to our published folder location, but specifically the wwwroot location as the root (as for now the web.config won’t be helpful). So you’d change it to look like this (a snippet of the YAML file)
    - uses: actions/checkout@v2

    - name: Setup .NET SDK
      uses: actions/setup-dotnet@v1
      with:
        dotnet-version: 3.1.201

    - name: Build App
      run: dotnet publish -c Release -o published

    - name: Build And Deploy
      id: builddeploy
      uses: Azure/[email protected]
      with:
        azure_static_web_apps_api_token: ${{ secrets.AZURE_STATIC_WEB_APPS_API_TOKEN_ICY_CLIFF_XXXXXXXXX }}
        repo_token: ${{ secrets.GITHUB_TOKEN }} # Used for Github integrations (i.e. PR comments)
        action: 'upload'
        ###### Repository/Build Configurations - These values can be configured to match you app requirements. ######
        app_location: 'published/wwwroot' # App source code path
        api_location: '' # Api source code path - optional
        app_artifact_location: 'published/wwwroot' # Built app content directory - optional
        ###### End of Repository/Build Configurations ######
This tells the Static Web App deployment steps to push our files from here. Go ahead and commit the workflow file back to your repository and the Action will trigger and you will see it complete:

We have now successfully deployed our Blazor Wasm app to the Static Web App Preview service! Now you’ll note that there is a lot of output in the Deploy step, including warnings about build warnings. For now this is okay as we are not relying on the service to build our app (yet). You’ll also see the note about Functions not being found (reminder we changed our parameter to not have that value). Let’s talk about that.
What about the Functions?
For now the service will automatically build a JavaScript app including serverless functions built using JavaScript in this one step. If you are a .NET developer you’ll most likely be building your functions in C# along with your Blazor front-end. Right now the service doesn’t automatically allow you to specify an API location in your project for C# function classes and automatically build them. Hopefully in the future we will see that be enabled. Until then you’ll have to deploy your functions app separately. You can do it in the same workflow though if it is a part of your same repo. You’ll just leverage the other Azure Functions GitHub Action to accomplish that. Maybe I should update my sample repo to also include that?
But wait, it is broken!
Well maybe you find out that the routing of URLs may not work all the time. You’re right! You need to supply a routes.json file located in your app’s wwwroot directory to provide the global rewrite rule so that URLs will always work. The routes.json file should look like
{
  "routes": [
    {
      "route": "/*",
      "serve": "/index.html",
      "statusCode": 200
    }
  ]
}
and put in your source project’s wwwroot folder. This will be picked up by the service and interpreted so routes work!
Considerations and Summary
So you’ve now seen it’s possible, but you should also know the constraints. I’ve already noted that you’ll need to deploy your Functions app separately and you have to build your Blazor app in a pre-step (which I think is a good thing personally), so you may be wondering why might you use this service. I’ll leave that answer to you as I think there are scenarios will it will be helpful and I do believe this is just a point in time for the preview and more frameworks hopefully will be supported. I know those of us on the .NET team are working with the service to better support Blazor Wasm, for example.
Another thing that Blazor build does for you is produce pre-compressed files for Brotli and Gzip compression delivered from the server. When you host Blazor Wasm using ASP.NET Core, we deliver these files to the client automatically (via middleware). When you host using Windows App Service you can supply a web.config to have rewrite rules that will solve this for you as well (you can in Linux as well). For the preview of the Static Web App service and Blazor Wasm, you won’t automatically get this, so your app size will be the default uncompressed sizes of the assemblies and static assets.
I hope that you can give the service a try with your apps regardless of if they are Blazor or not. I just wanted to demonstrate how you would get started using the preview making it work with your Blazor Wasm app. I’ve added this specific workflow to my Blazor Wasm Deployment Samples repository where you can see other forms as well on Azure to deploy the client app.
I hope this helps see what’s possible in preview today!
Please enjoy some of these other recent posts...
Comments